 The temperature needs of seed differ during
and after they germinate. The soil needs to be warmer during germination and
then cooler as they get larger. The
recommended temperature for seeds starting indoors is 75-90 degrees Fahrenheit.
Once germinated, most seeds are fine in 60-70 degrees Fahrenheit.
Showing posts with label How-To. Show all posts
Showing posts with label How-To. Show all posts
Optimum Seed Starting Temperature
The temperature needs of seed differ during
and after they germinate. The soil needs to be warmer during germination and
then cooler as they get larger. The
recommended temperature for seeds starting indoors is 75-90 degrees Fahrenheit.
Once germinated, most seeds are fine in 60-70 degrees Fahrenheit.Light Sources For Starting Seeds
 Different seeds have different requirements
in the amount of light they require for germination. Some seeds must have a lot
of light and others should have no light. Like the Times For Starting Seeds,
this should be listed on the package.
Once germination has occurred, the seedling
requires light in order to undergo its core life processes. It doesn’t matter
whether the light is natural or artificial.
Most seedlings require 12-18 hours of
sunlight per day.
Water Needs For Starting Seeds
When you’re ready to start the seeds, just
add water. The moisture softens the coating of the seed and allows the internal
food source to start feeding the seedling.
 A very important point to keep note of is
that the seed medium must stay moist at all times but not soggy. If it gets too
soggy, the roots and seed will rot and/or grow mold. However, if it gets too
dry, the roots will dry out and die.
Most garden centers sell Seed Raising Mix,
which is usually a mix of compost, soil and sand. This is much easier to grow
seeds in as it holds moisture much better.
Times For Starting Seeds
 When growing plants from seed indoors, you
can plant them nearly any time of the year. However, when setting out to plant
them outdoors, you need a strategy.
You should find out the date for the last
frost in your area and then the number of weeks prior to that date to plant the
seed. This is almost always printed on the seed package.
From here, you plant the seed and prepare
for growth. A general rule for planting seeds is about six to eight weeks
before the last frost date.
Growing Plants Or Vegetables From Seed

We’ve put together a small collection of
information about the basics of starting with seeds.
While starting a plant from seed may seem
more difficult, it has many benefits. You’ll be saving money as seeds are much
cheaper than plants, you’re able to start the growing season earlier and you
can extend your options on varieties available.
There is something very therapeutic about
starting plants from seed too! You are able to watch a small seed turn into a
healthy living plant.
How To: Train A Climbing Rose
Climbing roses grow two kinds of shoots. The main shoot is structural whereas the flowering shoots are for flowering. It is essential for the main shoot(s) to be tied to a support to keep the flowers off the ground.
Roses require 6+ hours of sun in the growing season and good soil for optimum growth.

Roses require 6+ hours of sun in the growing season and good soil for optimum growth.
1. Install The Support And Trellis
Anchor the support posts in the ground or attach them to another strong structure such as a fence. The roses can become heavy when wet and blown around. The trellis should be placed and attached firmly against the posts. It is best to keep a small air gap between fences or walls and the trellis to ensure good circulation.
2. Plant The Roses
The hole for the roses should be 1.5-2 times as wide as the root ball. The depth needs to be at least two feet deep. This may seem like a lot but as the plant becomes more developed, the roots will need all the nutrients they can get.
The center of the hole needs to be 20-30 inches away from the trellis. In cold climates, plant the graft union 2-6 inches below the soil and in warm climates 1-3 inches above the soil.
3. Watering And Fertilising
Water the plant very well! Spread compost or manure and phosphorus rich fertiliser around the base of the plant and water again. Mulching the base of the plant is optional but can help maintain the moisture in the soil.
4. Attach The Shoots
Locate and select the strongest structural shoots and tie them to the trellis or support. It is important not to tie them too tight. By placing the shoots horizontally, it will promote more fresh growth.
Notes:
The climber can go unpruned for two-three years before needing pruning.
Remove dead, diseased or damaged shoots.


When And What You Should Prune: A Pruning Guide
Where To Start?
A perfect place to start is to remove dead, diseased, or damaged stems as soon as you see them. Dead branches and stems attract harmful insects that increase the chance for disease.
 Another great place to start is to remove branches that are rubbing together and upright shoots growing off the trunks.
Annual Flowers
By removing the dead or faded heads (deadheading) of flowers, the plant is able to put more energy into blooming, therefore improves growth.
If the plant develops bare stems at the base, remove the stem and it will force the plant to grow more compact.
Perennial Flowers
By deadheading the flowers, the look of them will be significantly improved. It is also a good idea to deadhead the flowers if they are too leggy or starting to bend out from the middle of the plant.
A benefit of this is that most perennials will be able to push out another bloom cycle before deadheading again.

Deciduous Fruit Trees
Apples, crabapples, plums, peaches, cherries and pears should all be pruned in midwinter. This has been debated in the past due to removing some of the buds but the goal is to open the tree to more light and allow for a better crop of fruit rather that maximum bloom.
It is essential to prune a lot of fruit trees in winter because the plant is dormant therefore at less of a risk of bacterial disease.
Roses
 Prune roses and climbers that bloom annually after they finish blooming.
There are several roses that bloom repeatedly. Prune these to your own custom shape and always remove damaged and diseased branches.
 Shaped or Clipped Hedges

Buxus, privet and other shrubs are often trimmed to form a hedge. To form a wall or solid hedge, trimming several times when the new growth is coming through will make a big difference. It is essential not to have the top wider than the base as it will shade the lower branches.
Edging Your Lawn With A Line Trimmer
Growing Cacti Outdoors
While sharp and pointy, cacti are great for adding a bit of diversity in your garden. As in most parts of the world, they are not common, therefore can change your whole garden.
Growing cacti outdoors is easy! While they do need a well draining soil and lots of sunlight, once setup, they require nearly no attention. A commonly used soil for cacti is very high in gravel or ground rock. This allows the water from rain/watering to drain and not sit within the root base. Working rocks into your garden with the cactus can really create a unique look. Check out my post on Rock Garden Ideas for a larger picture on what you can do.
Another important thing to consider is sunlight. It is easy to get too protective over your garden and leave the most exposed and seen area as it is then hide the cactus 'experiment'. This isn't always the way to go as the cactus needs light, therefore some exposure is good.
Considering the size in the near and far future is an important concept to think about. While your chosen cactus may only be 3 feet high in a year, in 10 it could be much bigger. I have seen lots of people plant them just under cover to only have to dig them back up once they've got too big.
There are a few things to consider but once the final plans are done, cacti in your garden can really make it that little bit better.
Have a good weekend!
 |
| cactusinfo.net |
Another important thing to consider is sunlight. It is easy to get too protective over your garden and leave the most exposed and seen area as it is then hide the cactus 'experiment'. This isn't always the way to go as the cactus needs light, therefore some exposure is good.
Considering the size in the near and far future is an important concept to think about. While your chosen cactus may only be 3 feet high in a year, in 10 it could be much bigger. I have seen lots of people plant them just under cover to only have to dig them back up once they've got too big.
There are a few things to consider but once the final plans are done, cacti in your garden can really make it that little bit better.
Have a good weekend!
9 Tips For a Perfect Lawn
It is a proven fact that improving the look and quality of your lawn can raise the value of your property. Here's 9 tips on creating and maintaining the perfect lawn.
1. Choose the right seed for your area. Some grass types will thrive and others will not so it is important to have the grass type sorted before seeding.
2. Prepare the soil for the seed. Raking the soil 10-20cm deep is essential in providing the best conditions for the seed. Once raked, smooth and pack in the soil. This is best done with a roller.
3. Lawn edging makes a lawn look 100% better. A fine, easily determined edge will ensure the grass will look tidy and be easy to maintain.
4. Cut the grass regularly to ensure thick and healthy growth. A regular cut encourages the grass to bunch up and fight off weeds.
5. Sow the seed in autumn. This is the best time for grass to be sown as it is still warm but offers natural watering too.
6. Providing adequate drainage is important in the reduction of weed growth and a healthy, non-patchy lawn.
7. Use a weedkiller that wont kill the grass to get rid of the prickles in the lawn. The best time to do this is spring.
8. Aerate the lawn using an aerator machine or garden tools by punching holes in the soil. This will improve the composition of the soil.
9. Fertilize your lawn in autumn and spring for best growth. If the lawn in new, you will need to be careful with what product you pick as some fertilizers can burn young grass.
1. Choose the right seed for your area. Some grass types will thrive and others will not so it is important to have the grass type sorted before seeding.
2. Prepare the soil for the seed. Raking the soil 10-20cm deep is essential in providing the best conditions for the seed. Once raked, smooth and pack in the soil. This is best done with a roller.
3. Lawn edging makes a lawn look 100% better. A fine, easily determined edge will ensure the grass will look tidy and be easy to maintain.
4. Cut the grass regularly to ensure thick and healthy growth. A regular cut encourages the grass to bunch up and fight off weeds.
 |
| wrightgardenservice.com |
6. Providing adequate drainage is important in the reduction of weed growth and a healthy, non-patchy lawn.
7. Use a weedkiller that wont kill the grass to get rid of the prickles in the lawn. The best time to do this is spring.
8. Aerate the lawn using an aerator machine or garden tools by punching holes in the soil. This will improve the composition of the soil.
9. Fertilize your lawn in autumn and spring for best growth. If the lawn in new, you will need to be careful with what product you pick as some fertilizers can burn young grass.
How to Plant a Hedge
Hedges are a great opportunity to improve aesthetics, propagate or even provide privacy. With good preparation and planting, your hedge can thrive and look the part! They make a great little garden wall without having a fence or barrier.
Two of my favorite hedges are Camellia and Buxus hedges. They look great, grow well and are easy to maintain.
When planting, there are a few important things to consider; equal (or close to) sized plants and soil quality. Having similar sized plants will ensure they grow at a similar rate. Soil quality is very important. When growing hedges, you will get good healthy growth in a good quality soil.
Line the area of planned hedging and dig up about 1-2 feet deep and wide. It is also a good idea to mix in compost as this will supply the plants with vital nutrients. Small hedges like Buxus should be planted 20-30cm apart. Larger hedges should be planted between 50-100cm apart. When buying the hedge, ask the salesperson for distance between your species of hedging.
Look at my post on How to Plant a Shrub or Tree for more detailed information on the planting process. Best of luck with your hedge!
 |
| lymefield.com |
When planting, there are a few important things to consider; equal (or close to) sized plants and soil quality. Having similar sized plants will ensure they grow at a similar rate. Soil quality is very important. When growing hedges, you will get good healthy growth in a good quality soil.
Line the area of planned hedging and dig up about 1-2 feet deep and wide. It is also a good idea to mix in compost as this will supply the plants with vital nutrients. Small hedges like Buxus should be planted 20-30cm apart. Larger hedges should be planted between 50-100cm apart. When buying the hedge, ask the salesperson for distance between your species of hedging.
Look at my post on How to Plant a Shrub or Tree for more detailed information on the planting process. Best of luck with your hedge!
How to Plant a Shrub or Tree
 |
| treesonearth.org |
1. You want to start by thoroughly watering. This will help with maintaining moisture in the root ball and breaking it up enough to not damage the roots but spread them.
2. Once this is done, dig a hole much bigger than the root base of the plant. A good rule is to have it about 1.5-2 times as wide and deep as the root base.
3. Optional: Mix into the soil some compost. This will help with supplying nutrients to the plant in its new home.
4. Place the plant in the hole. The top of the root base should be at ground level. Move the dirt (and compost if step 3 was done) into the gaps around the plant and apply pressure to pack the dirt in. Do not over pressure it.
5. Thoroughly water all the soil within 2-4 feet around the plant. This will ensure the root base and surrounding soil has enough moisture to maintain and will contribute to settling the plant into the hole.
It also helps to remove any damaged or dead roots from the root base. However, you should avoid damaging the roots and plant as every little bit helps.
How to Water a Potted Plant From the Bottom Up
 |
| deepgreenpermaculture.com |
Pots without Saucers: This can take a little more time but tends to work just as well. If the pot is too big then put in in a large plastic box/tray. Fill it with water and give it time to let the water soak up through the soil. Remove the pot from the water once damp on the top. If the pot is small, a sink works well. Place the pot in the sink and fill with water until the water is about 1 inch below the soil level. It will quickly soak up through the soil and show dampness on the top. Remove from sink when damp.
Note: You do not want the pot sitting in water for long periods of time as the soil does need to drain.
Watering plants from the bottom is crucial in maintaining good oxygen levels and good soil composition in the pot. It may seem harder and annoying but it really does pay off and always feels like the growth rate is improving for some reason.
Pots in Saucers: If your pot is in a saucer, it will be easier. A good way to water from the bottom is to fill the saucer as high as you can with water before it overflows. This allows the water to slowly absorb up throughout the soil. If the top of the soil doesn't look damp once all the water is gone, fill the saucer again. Repeat this until the soil looks damp on the top.
How to Grow Snow Peas - Easy and Delicious
 |
| agoodhuman.wordpress.com |
Snow Peas are super easy and fun to grow. They make a great little plant project for children or even just as your first plant grown from seed. I have had great success with Snow Peas and it has been very rewarding.
All you need is:
1. Seed Raising Mix (normal topsoil works too)
2. Snow Pea seeds
3. Seed tray or pots
4. Water (of course!)
Here is 5 easy steps on how to do it:
1. Fill the pots or seed tray with seed raising mix. When filling a seed tray it is alright to fill it to just below the rim. If using pots or seed pots, fill to about 1 inch below the rim. Pack the soil in firmly with your hands/fingers to stop it from sinking when wet.
2. Water the soil from the bottom. This allows the soil to get fully and naturally wet rather than partially wetting it.
3. Use a small stick (about the size of the Snow Pea seed) to poke holes in the soil. The holes only need to be about 2-4cm deep. This is where the seeds are going to go.
4. Drop a seed into each hole. You can also drop two seeds into each hole as some seeds may not germinate. This will not damage the plant as the faster growing plant will overrun the other one.
5. Lastly cover the holes and firmly push over the seed.
Best of luck!
3 Ideas on How to Save Money in Your Garden
We all like to design and put in place our own plans so I thought I'd throw together a few ideas I have come up with or found on the internet.
Worm farm by using plastic boxes:
A great and cheap way to build a worm farm is to use plastic storage cubes. The good thing about these is that you can start with two. One catch tray and one first waste tray.
All that needs to be done is holes drilled in the top of the waste tray and a cover put on. The cover can just be a rubbish bag (this is mostly to stop the worms from getting over exposure).
As each rubbish tray gets more full, add another with holes drilled.
 |
| full-monte.me |
The next and very easy way to save money when planting plants is to use tyres. They are usually free to take at a lot of car yards.
If you fill them with soil, they make great planter boxes and can be arranged into nearly any shape you want. A lot of people even stack them!
 |
| repeatcrafterme.com |
Pallet Gardening:
Pallet gardening is another great way to save money. Instead of seed trays, planter boxes and expensive wood, you can get free pallets from your local hardware store and use them to protect and grow your plants. It doesn't just have to be veges either.
All 3 of these ideas are easy and close to free to do. While it isn't always easy to get your hands on tyres or pallets, in the long run it is definitely worth it. Good luck!
A Few Quick Tips on Hedge Cutting
 |
| nakoo.net |
It can be quite easy if you use a guideline. This is basically a line you attach to two ends of the hedge and follow along with your cutters. This will allow a straight cut.
We all know that feeling of dreading to do something. A lot of us dread cutting the hedge because it is so hard to cut straight and still look nice.
Another good tip is to cut 6 branches and then step back and look from a distance. Why 6? I'm not sure, but it just seems like a good number. If you cut it in small amounts, step back, check from a distance then you will be able to see what needs to be cut. This also allows you to shape the hedge into different (non-straight) shapes.
 |
| Had to throw this one in from tradesman4u.wordpress.com. Its great! |
How to Germinate Seedlings
By being a gardener, it is thrilling to have grown your own plant from seeds. The growth stages are great to watch and it is definitely worth it.
You want to pick seeds from a reputable source. If they seem to good to be true, they probably are. Go for some seeds that will be fine in your area. If in doubt, Google it.
How to germinate them:
1. Find out when the best time of year is to grow seedlings. In some cases, you can grow them at any time of year indoors.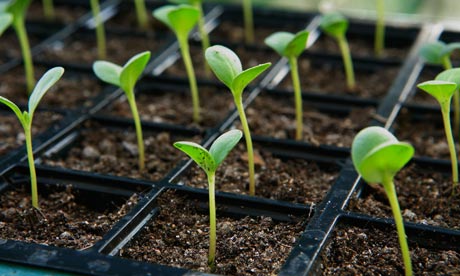 |
| theguardian.com |
3. Choose a seed container 2-3 inches deep. If using trays with individual segments, fill them to about 1-2cm from the top.
4. It is important to wet the soil before you plant the seeds so it can compress down from the water and not over cover the seeds. Dip the bottom of the pot, tray or seed tray in water and let it raise to the top. It will look damp when fully watered.
5. If the seeds do not need to be soaked for a few hours prior to planting, plant them about 3 times the thickness of the seed. This is a good rule to know when planting.
| greeningofgavin.com |
How to Start a Worm Farm
 |
| hivetaranaki.co.nz |
About 40% of a households waste is organic matter that can be fed to worms. 40% is a big number! You could be recycling this waste and using it to allow your garden to thrive. Worms start from the bottom layer in a worm farm and move up as they eat all the organic matter. They leave behind vermicast (poo!) and their urine. Both of which are great for your garden.
How to start your worm farm:
1. Piece together a worm farm kit with one tray above the collection tray. This is the tray you will put your waste in.2. Put newspaper, light soil, coir or paper shreddings down first then cover with some organic matter. This is where your worms will live.
3. Over time or each day, put your food scraps and some garden scraps into the worm farm. As each layer gets more full, you add another one and the worms will move up.
4. Once the bottom layer has no (or very little) worms in it, remove it and use it in your garden as compost, fertilizer or mulch.
Worms can eat anything from hair clippings, manure, food scraps to even grass clippings. Make sure you keep a bit of air in the worm farm by occasionally adding shredded paper or cardboard.
Good luck with your worm farm endeavor!
How to Air Propagate - Taking Cuttings After They've Rooted!
Air Propagation is an interesting way to get more plants. Unlike cuttings, air propagation gives us the opportunity to grow roots before the plant is cut. This is a great way to ensure the survival of the plant and its cuttings.
 |
| airpropagator.com |
1. Pick the plant - It needs to have 2+ nodes for the spot that will be used.
2. Wound the plant. This means to cut through the bark and removed a layer 2-4 inches long. This does not need to be done delicately.
3. Fill the bulb or plant pot with soil being used and place it on the tree. The soil needs to be all the way around the trunk of the plant. Now tie it on to the tree and secure it over the wound.
4. Water it every day and within a few weeks, roots will have grown
Good luck with your propagation and feel free to ask a question or two!
Subscribe to:
Posts (Atom)